-
Spring is here and what a relief! Birds chirp louder, trees leaf out, flowers work overtime to bloom, and temperatures rise slowly. MarieNatie released six reformulated pressed eyeshadows that are vegan, made with all natural ingredients, and void of palm oil and gluten. Plus, MarieNatie is a cruelty-free company--no animal testing at any point for this cosmetic brand. Infused with certified organic olive leaf and lavender extract, the eyeshadows are highly pigmented, apply easily wet or dry, and they’re all you need to create pretty warm-weather looks.
Lavender Dreams is a dreamy light purple shade which is great if you want to try a subtle hint of colour. Swipe Lavender Dreams over your eyelids and let this shade become your new neutral.
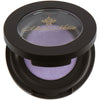
Smokin’ Plum is a dark purple shade that adds the perfect touch of sultry colour. Use Smokin’ Plum as a crease colour or as an eyeliner by dampening an eyeliner brush with water, dip into the eyeshadow, and draw a thin or thick line close to your lashes. I highly suggest trying a cat eye with this gorgeous shade.

Bark is a medium brown shade and perfect as a crease colour and to define lower lashes. Bark is also stunning as a soft smoky eye when paired with red lips and glowing bronzed skin (achieved with makeup or a self tanner because it’s important to protect your skin from harmful sunrays).

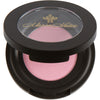
Pink’d is a soft pink shade that adds an extra touch of femininity. Pair it with a matching blush and lip colour and you’ll definitely be pretty in pink.
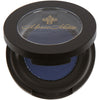
Blue Velvet is a gorgeous navy blue shade that will challenge the traditional smoky eye. Pair your Blue Velvet smoky eye with peachy nude lips and you’re set for a night out! Another great way to use Blue Velvet is as an eyeliner.
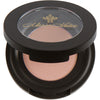
Flesh is a peachy nude shade which is flawless for spring and transitions nicely into the sweltering summer weather. You know the days when it’s so hot out, you don’t feel like wearing any makeup? Wear it on its own for a polished natural look or as a base for a more elaborate creation.
Guest author Natacha Cole is a former professional makeup artist and an advocate of cruelty-free cosmetics.
-

Temperatures have dropped, holiday decorations are on display, and Elvis Presley’s rendition of Blue Christmas plays in practically every store. We’re in the midst of the holiday season and as you conquer the hustle and bustle of crowds for last minute gifts and holiday preparations, what if you run out of time to get yourself ready on the day you’re receiving guests? It could easily happen!
Don’t worry, we’ve put together a 5-step soft smoky eye look you can easily do and not have anyone be the wiser of how quickly you got ready. This look will compliment any eye colour and outfit because it’s timeless and universally flattering.
Step One: Prepare your eyelids with an eyeshadow primer or a quick swipe of concealer. Priming your eyelids beforehand will increase the staying power of your eyeshadow.
Step Two: If you prefer to not use black (although the MarieNatie loose mineral eyeshadow in Noir is a pretty soft black with subtle shimmer), try the loose mineral eyeshadow in Chocolate, a shimmery copper brown.
Empty some of the eyeshadow into the underside of the cap and take a flat compact eyeshadow brush and damp it slightly. Applying the loose mineral eyeshadow wet will ensure an intense colour payoff and a quick application. Dip the brush gently into the loose eyeshadow and pat the colour all over your eyelid making sure to avoid harsh lines, which is key to a smoky eye. To soften harsh lines, use your finger or a blending brush to blend outwards into your crease. Tip: If you would like a deeper colour, add another layer of eyeshadow.
Step Three: Use the same brush (if it has a tapered point) or use a smudge brush, pick up a small amount of eyeshadow that remains in the lid and gently drag the brush under your bottom lashes.
Step Four: Apply a thin line of eyeliner or a thicker line (it’s as you prefer) with the MarieNatie gel liner in black by using an angled eyeliner brush (or your preferred eyeliner brush). Line your waterline and tightline with the MarieNatie eyeliner pencil in black to intensify the look and define your eyes even more.
Step Five: To finish the look, use an eyelash curler before applying the MarieNatie Perfect Lash mascara in black on your top and bottom lashes. Tip: Add a set of false lashes for extra fullness and length.
Your guests will never know how quickly you put this polished and glamorous look together.
Happy holidays from everyone at MarieNatie!
Guest author Natacha Cole is a former professional makeup artist and an advocate of cruelty-free cosmetics.


